-
Locations
Campuses in EuropeCampuses in The AmericasCampuses in AsiaLe Cordon Bleu International
- Online Learning
Contact your local representative - Our Story
- Programmes
- Brochures
- News & Events
- Contact
- Find Course

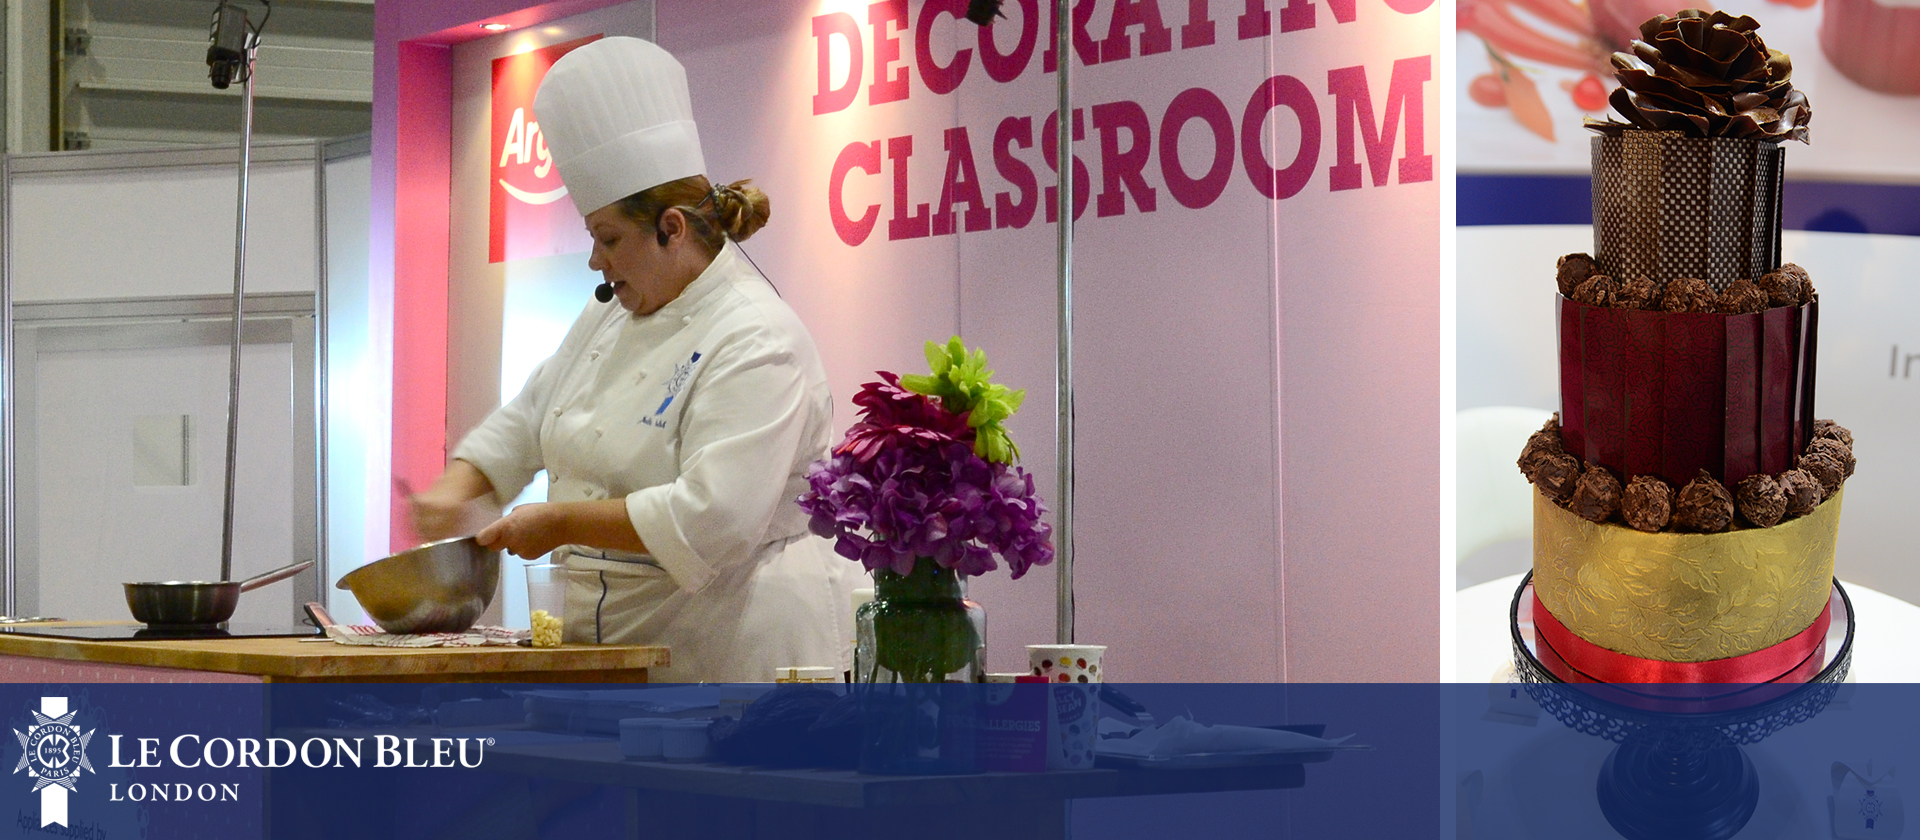
Le Cordon Bleu London attended the Cake & Bake Show 2016, where our Head Pâtisserie Chef Julie, demonstrated her extensive knowledge and expertise in tempering chocolate. Tempering is necessary if you want to achieve a high gloss, hard, brittle texture, a longer shelf-life, and more of a resistance to warm temperatures in your chocolate. A properly tempered chocolate should break with a crisp snap.
Here are the top tips that we picked up from our Chef on the day, to help you perfectly temper chocolate at home.
1) Understand the science
The cocoa butter in chocolate consists of many different fat groups with melting points that vary between 16°c and 46°c. Because of the varying melting points, when melting your chocolate the ideal temperature is 50°c as all of the different fats will melt by this point.
For white chocolate, which contains no cocoa paste, the ideal temperature for your chocolate to reach is 45°c for the same reason. In order to cool completely, your dark chocolate needs to reduce to 27°c, and your milk and white chocolate needs to reduce to 26°c.
It is when you reheat the chocolate (to 30-31°c) that it becomes tempered and ready to use for cake decorating.
2) Use a technique that suits you
Melting chocolate:There are many different ways to melt the chocolate so it is best to choose a technique that best suits you. Chef Julie used the double pan method during the demonstration but uses a microwave when at home as it is more convenient.
With the double pan method the chocolate should be placed in a clean, dry bowl, over a saucepan containing a small amount of hot water. The objective is to melt the chocolate without getting it too hot and to pay attention to the chocolate’s melting point as mentioned previously.
Cooling chocolate: Again there are many different methods that you can use to cool down the chocolate. With the seeding method, you add more finely chopped chocolate to the melted chocolate, with the table method, you pour out some of the chocolate onto a table and agitate it, and with the direct method you place the bowl of melted chocolate over a bowl of ice water so that it cools.
Chef Julie used the direct method in the demonstration. As soon as the chocolate starts to cool around the edges, you remove the bowl from the ice and stir until the cold chocolate on the sides is fully incorporated. You repeat this stage until the ideal cooling temperature is reached, then you place the bowl back on the bain marie briefly, and stir thoroughly until it reaches a temperature of 30°c to 31°c.
3) Have fun and explore the different possibilities
There are so many different things that you can do with tempered chocolate. Below are a few of the techniques that Head of Pâtisserie Chef Julie demonstrated at the Cake & Bake Show:
Chocolate truffles: Use truffle molds (or an ice-cream scoop as Chef Julie did) and fill them with tempered chocolate. For an added crunch, sprinkle them with shaved chocolate before the truffles completely harden.
Mold designs: You can use different shaped molds, for your tempered chocolate, which you can buy from specialist suppliers.
Cut-out shapes: Create unique shapes by spreading tempered chocolate evenly over acetate sheets, allowing it to harden slightly and then cutting your desired shape using a knife or cutter.
Wraps or bands: Spread tempered chocolate evenly over acetate strips, allow the chocolate to harden slightly, then carefully pick up and wrap around your cake. Overlap the edges of the chocolate wrap to seal, chill until fully hardened and then carefully unwrap the acetate.
Piped shapes: Fill a piping bag with tempered chocolate, pipe the required design onto an acetate sheet and allow to harden at room temperature before refrigerating.
4) Think outside of the box!
Chef Julie revealed that she is a regular at her local DIY and stationary shops as she likes to source items that she can use for her tempered chocolate creations! Here are some of Chef Julie’s finds:
Laminate film: This can be used to make your own molds. Simply place the film over the object that you want to make a mold of, and warm it with a hair dryer until it takes the object’s shape. After allowing the mold to cool and stiffen, you can use it create unique tempered chocolate models.
Embossed Wallpaper: Pick your favourite embossed wallpaper from your local DIY shop, and use it as you would when making chocolate wraps and bands on acetate (as above), making sure to spread your tempered chocolate on the inside of the paper. Chill until fully hardened and then carefully remove the wallpaper to reveal your desired pattern in chocolate!
Copyright © 2024 Le Cordon Bleu International B.V. All Rights Reserved.